
Imagine falling asleep under a blanket of twinkling stars. A starry sky ceiling can turn this dream into a reality. This beautiful feature adds magic to any room. But the idea of installation might feel daunting. Do not worry! This guide will walk you through the process step by step.
We will explore how to install different types of star ceilings. You will learn about the tools you need and the best methods for your home.
Before you buy any materials, take time to plan. Good planning makes the installation smooth and successful.
Where do you want your star ceiling? Popular choices are bedrooms, home theaters, and media rooms. Think about the size of the ceiling. This will determine how much material you need.
What kind of night sky do you want? Do you prefer a simple star light ceiling or a complex galaxy ceiling with nebulae? Our pattern library has many options like stars, moons, and constellations. We also support personalized customization services.

The heart of your project is the ceiling panel and the lighting system.
We provide three professional-grade board options. Each one suits a different need.

This is what creates your stars on the ceiling.
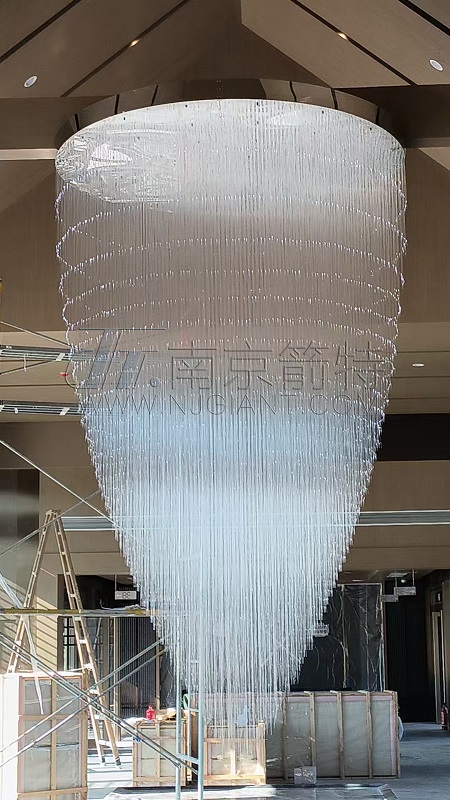
Fiber Optic Star Ceiling: This system uses a single light projector. Thin fiber optic cables run from the projector to the ceiling panel. This creates very realistic, twinkling stars. A fiber optic ceiling is known for its authentic night sky effect.
Now, gather your tools and prepare the space.
The installation method depends on your existing ceiling.

If your room already has a smooth gypsum ceiling, we have a simple solution. We provide custom-designed small packages for this situation.
This method is fast and causes little mess. It does not damage the original ceiling structure. You can install the new starry ceiling directly over the old one. This is a great way to get a ceiling with star lights without a major renovation.
For a new construction or a room with exposed beams, you have more flexibility. We recommend using fiberboard or aluminum panels here. These materials are strong and perfect for this environment.
For Fiber Optics: Drill tiny holes in the panels where you want each star. Then, thread the fiber optic cables through these holes from behind. Connect all the cables to the light projector.
Test the System: Before you finish, turn on your starlight for ceiling. Make sure every star lights up correctly.
Once everything is installed and tested, step back and admire your work. You have successfully created a beautiful ceiling stars display. Your new star light ceiling will provide years of wonder and relaxation.
Installing a starry ceiling is a rewarding project. With careful planning and the right materials, you can bring the cosmos into your home. Enjoy your new view of the stars in the ceiling


 IPv6 network supported
